Art Extraction Lab
How we went from "AI images the design team has to redraw" to a repeatable process that produces factory-shaped art packages. Three test rounds, eleven print locations, and every mistake along the way.
The goal
Blended's sales lift comes from showing buyers new designs fast. The slow part is turning a picked design (often an AI image or a sample photo) into art that a factory can screen-print. Today Larry, Sara and Ernesto rebuild that art by hand.
In July, Chris put the target in writing: if AI-separated art works for the Altar'd State samples, "we'll know that we can send sample requests directly to the factory going forward." This lab is about making that true.
What the team and the factory actually need
Before testing, I researched how professional apparel artists prepare files, then checked Blended's own Outlook for real finished art. The mailbox taught more than the web.
Separated screens + size + Pantone
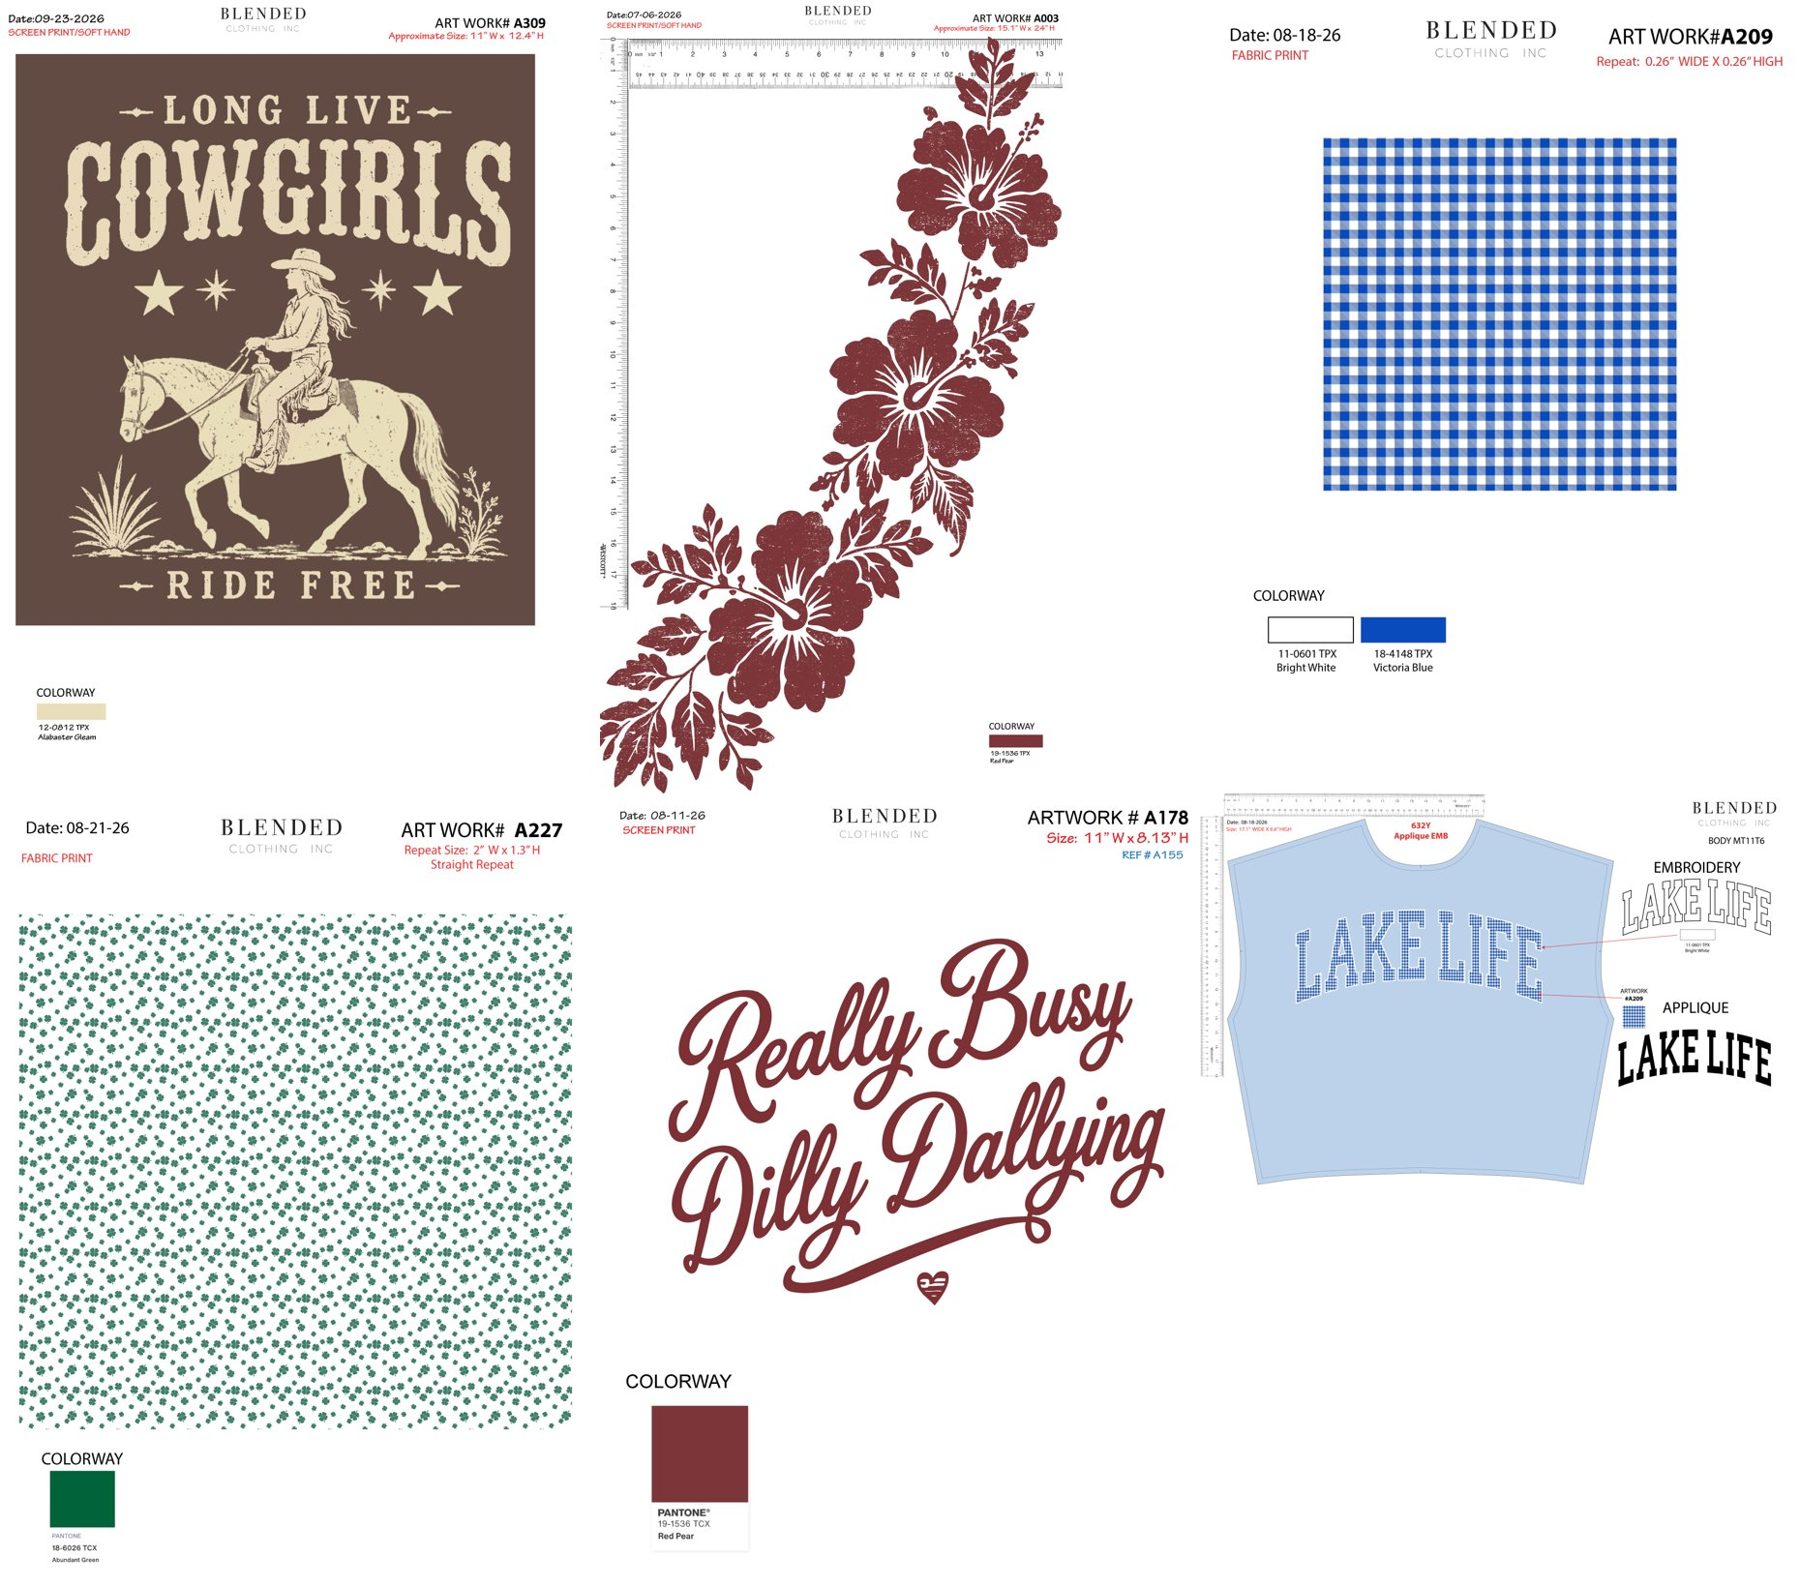
The factory's July 15 note: "send screen separated art file + size idea of 'length × width' & Pantone no# for each screen." Their CAD staff otherwise separate by hand in Illustrator, and art with many colors and sharp lines "may not be accurately recreated." They print on cut panels, so sleeves are separate files.
The pitch sheet
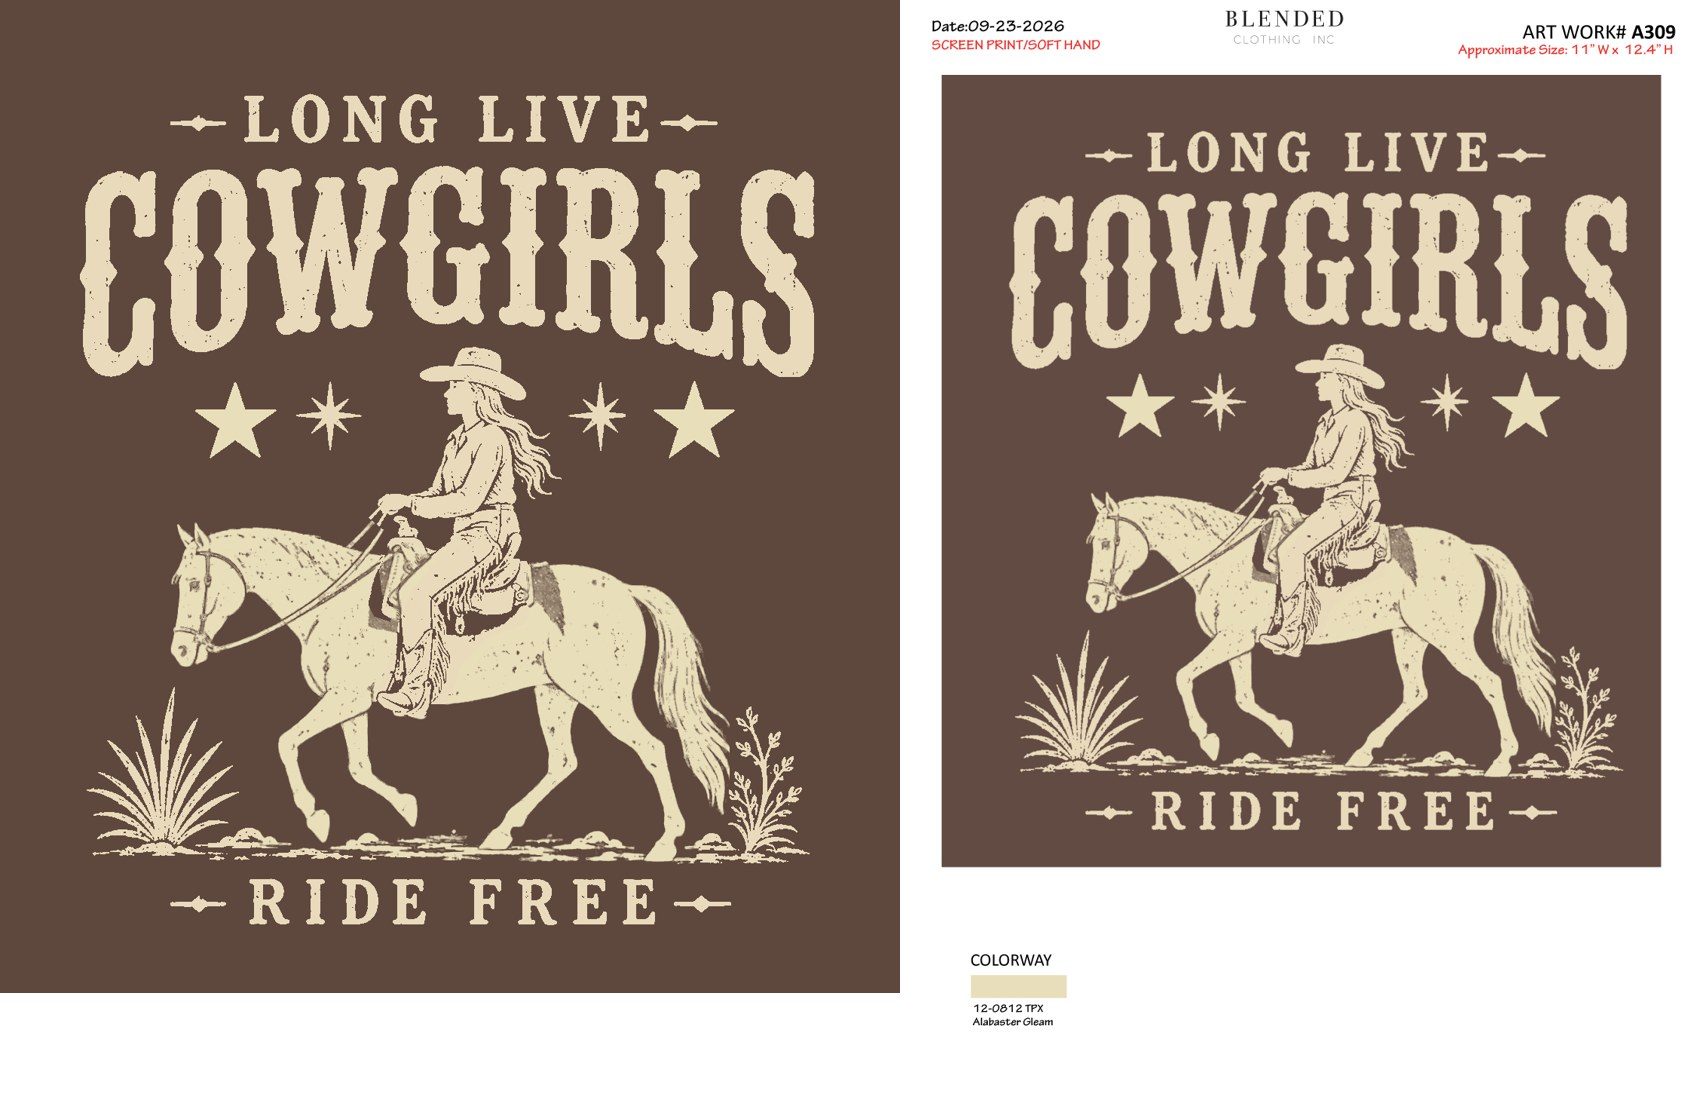
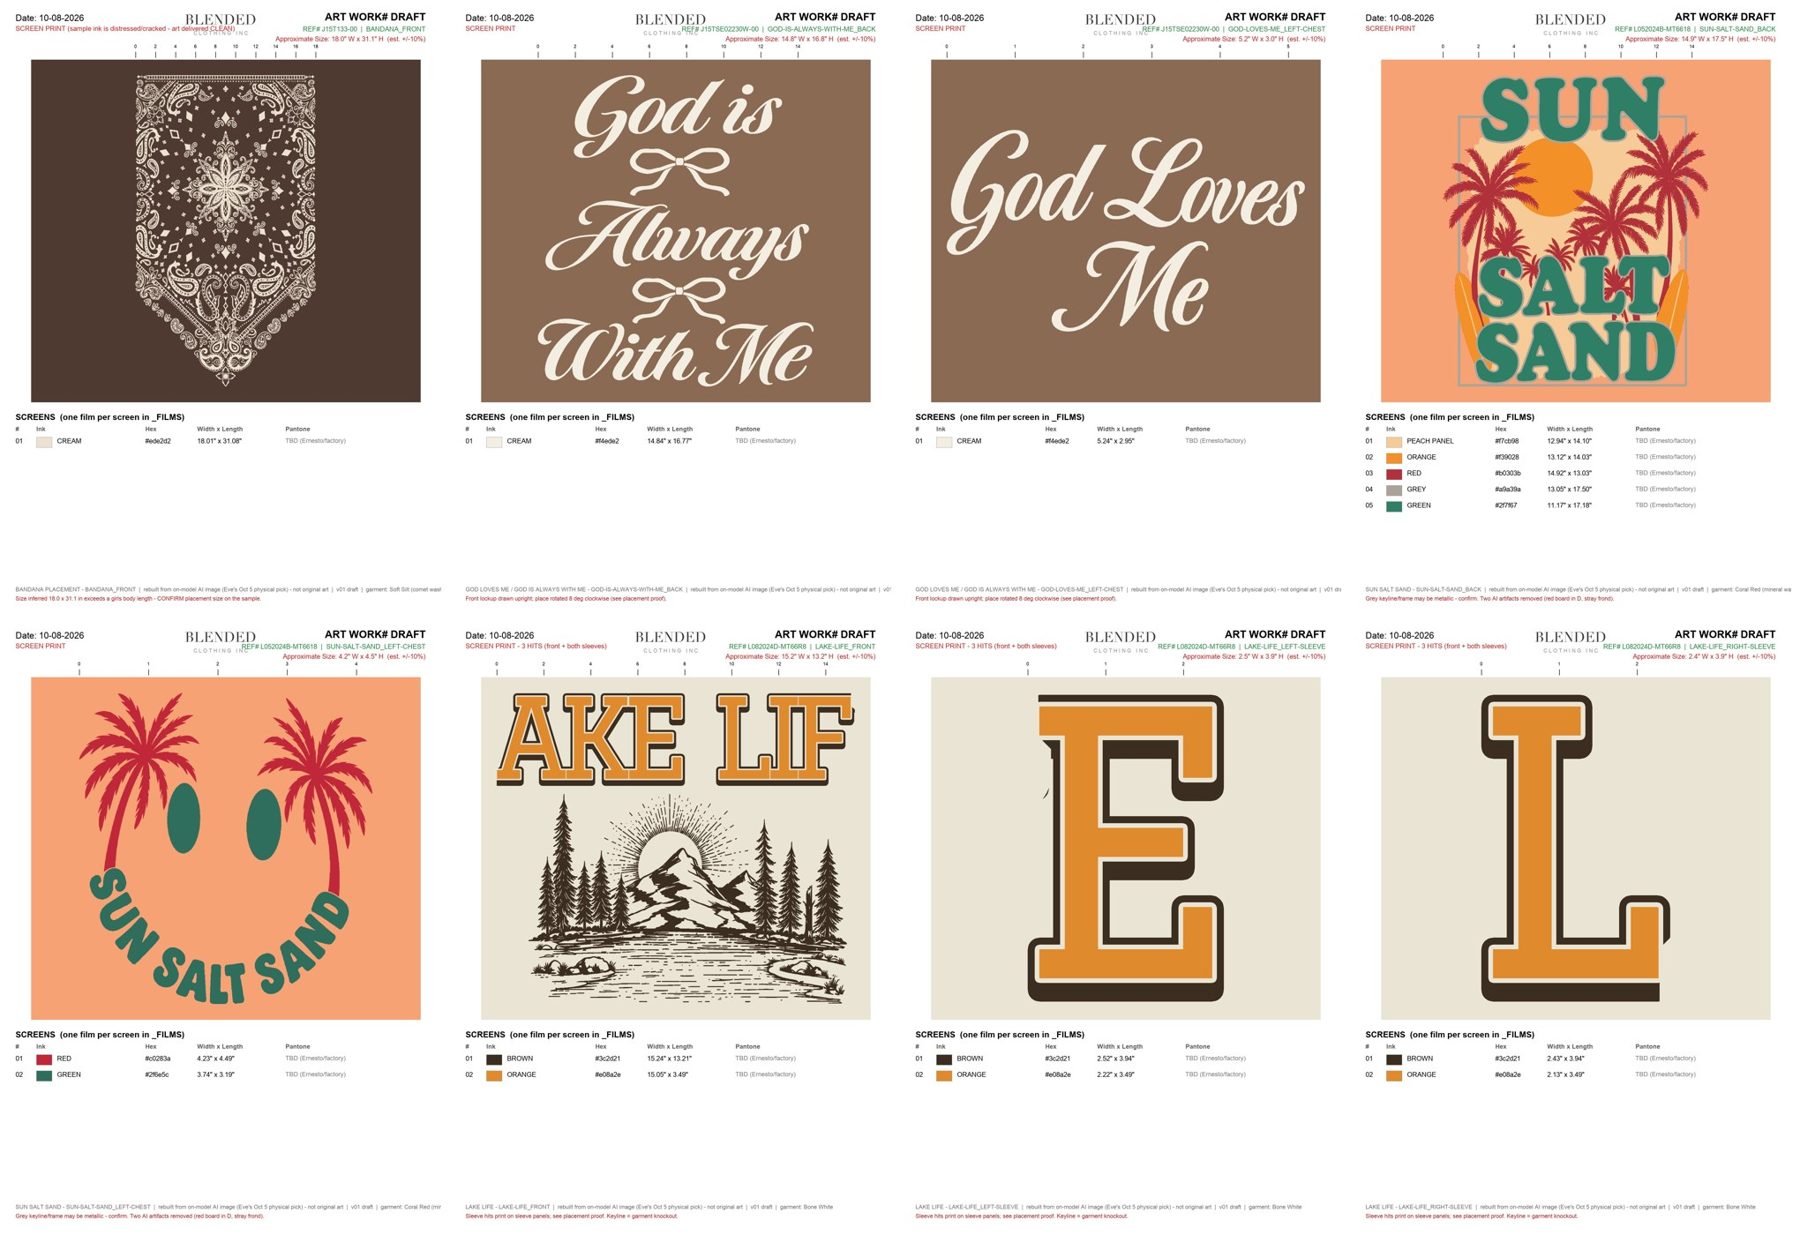
Ernesto's finished output is a one-page pitch sheet: date, technique, art #, ref #, approximate size, art on the garment color, and a Pantone TPX colorway. He often reduces a design to very few inks: Cowgirls went from 87 colors in our file to 1 ink.
"No limited trace"
On Aug 10, Sara said our color-reduced Boot Barn files were "not turning out well" and asked for the high-res extracted art without a limited-color trace. The designers want a clean full-color master to work from.
Transparent, full size
Larry's own handoff to Ernesto is a 4500 × 5400 px transparent PNG at 300 ppi (15" × 18"). Complete art per print location, not arbitrary object cuts.
So the deliverable has to be both: a smooth full-color master (for Sara and Larry) and a separations file with one screen per ink, sizes and a Pantone slot (for Ernesto and the factory).
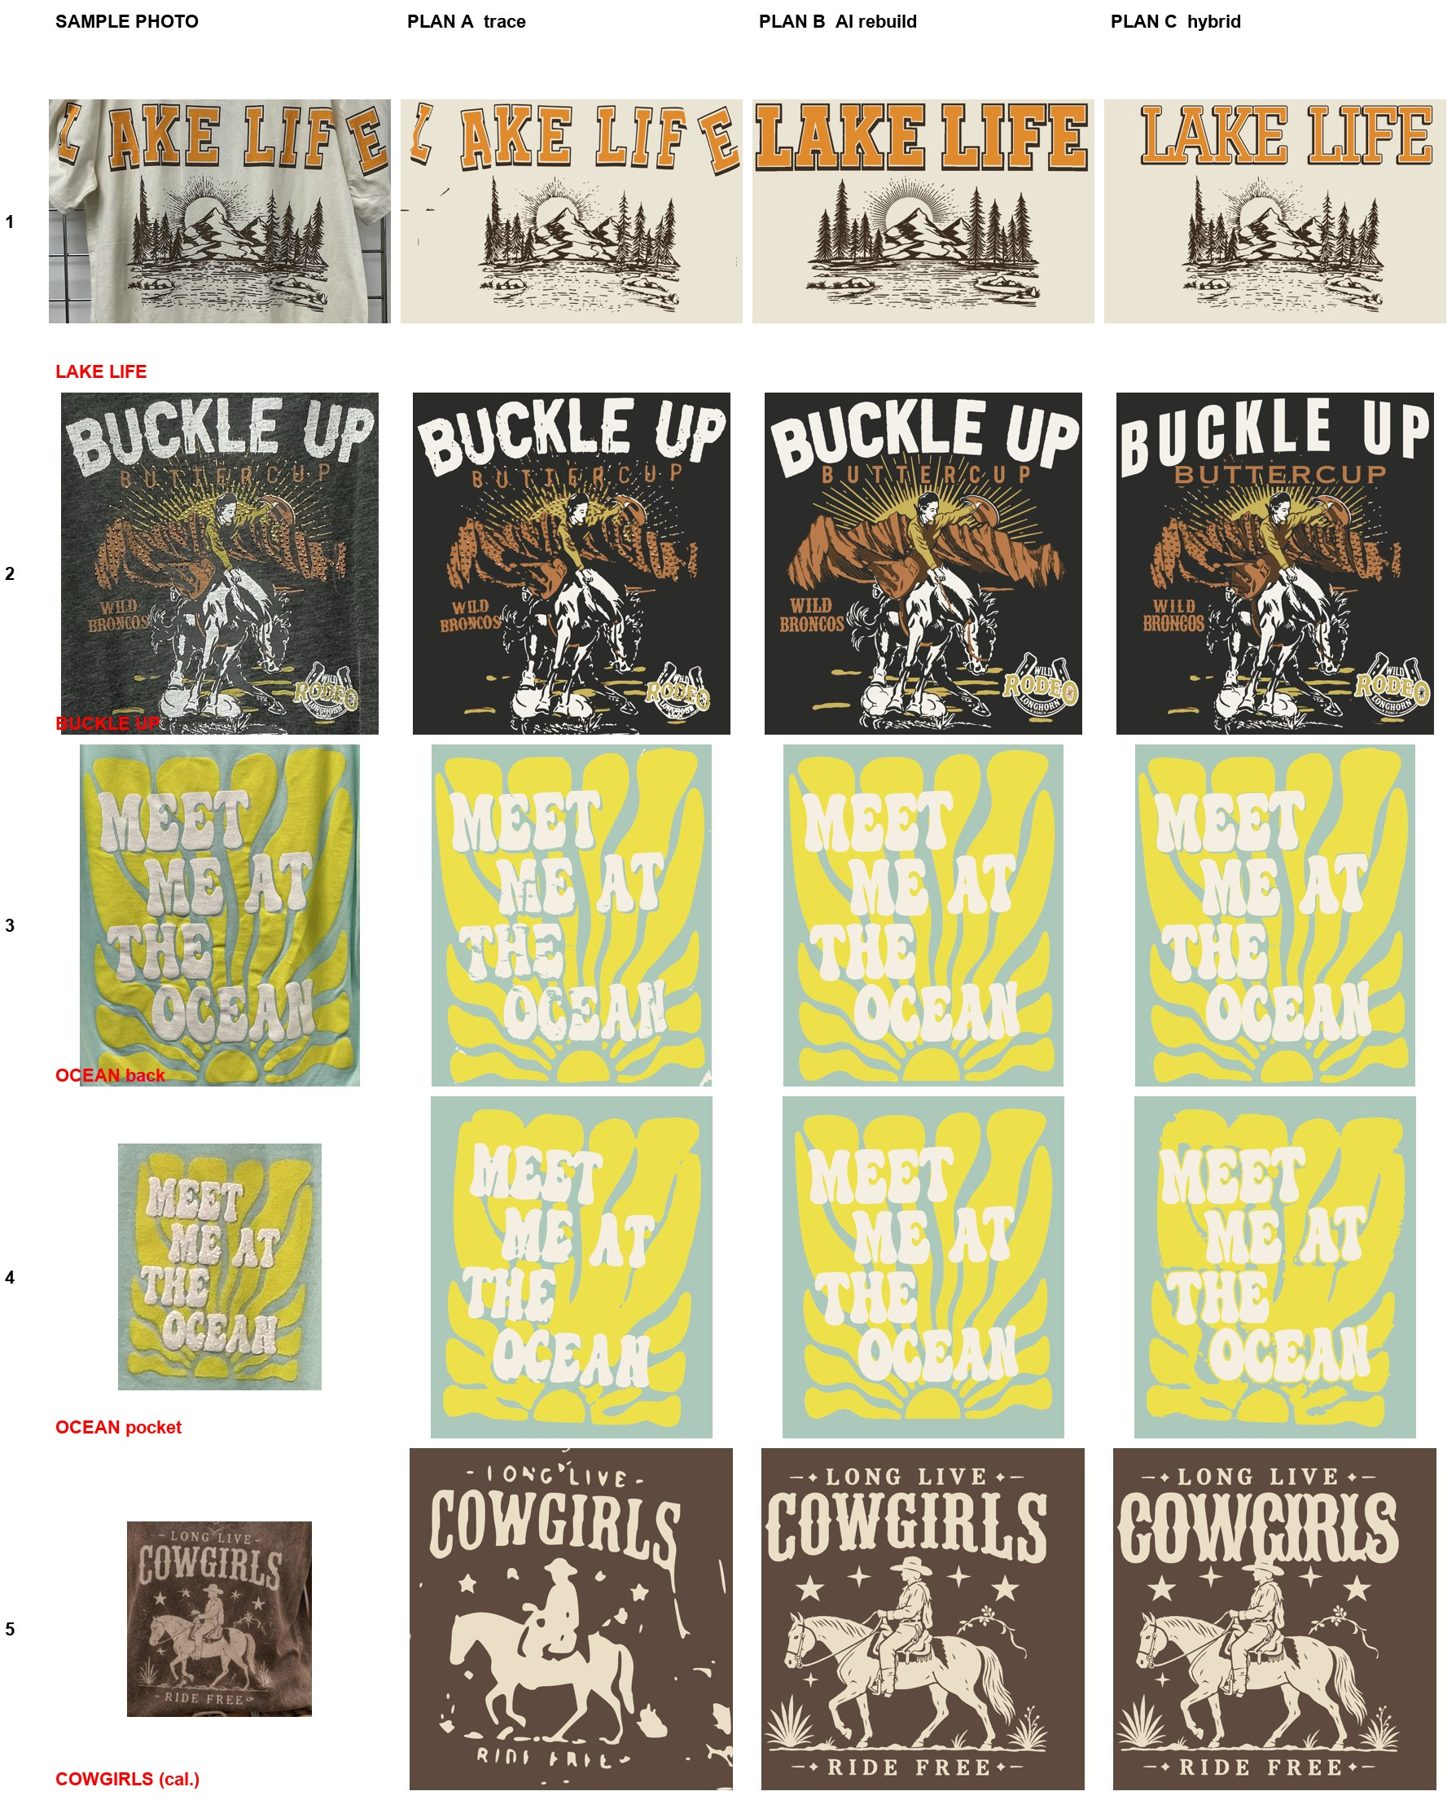
Round 1: three methods from the hanger photos
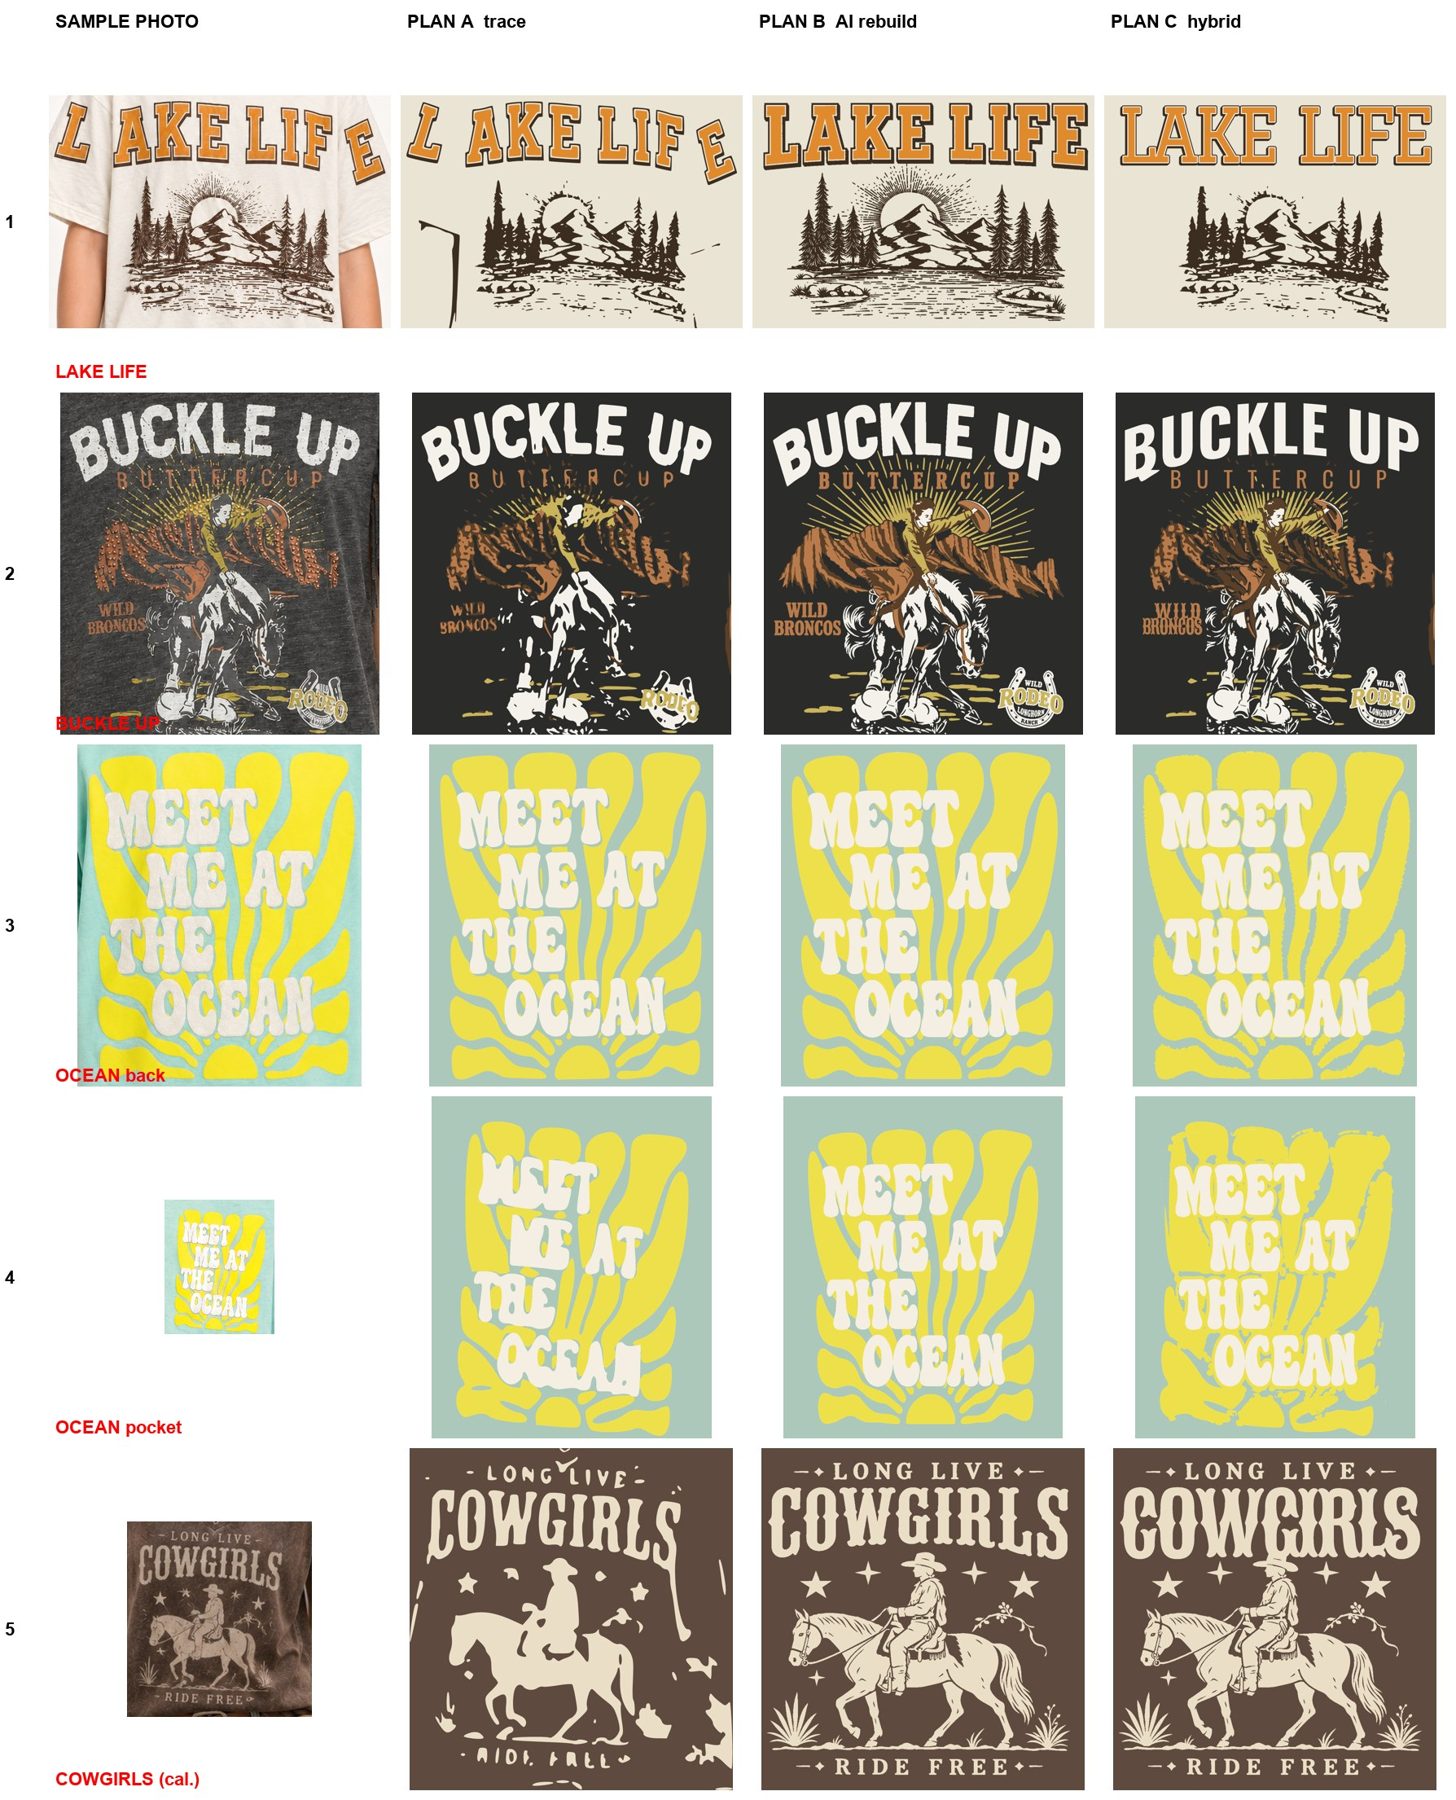
Test set: three of the Buckle buyer's Oct 5 physical picks (Lake Life, Buckle Up Buttercup, Meet Me at the Ocean) plus Cowgirls as a calibration against Ernesto's finished file. The source was the real sample on a hanger: about 62 pixels per inch at print size, measured from the 3-inch gridwall behind the shirt.
Trace from the sample
No AI pixels. Sort every pixel into an ink, trace each ink's shape (potrace), redraw at 300 ppi.
Faithful shapes, but melted edges and illegible small text ("IONG LIVE"). Unusable below about 150 ppi.
AI rebuild, locked to the sample
Codex redraws the art in flat inks; Photoshop lines it up over the sample, upscales and snaps it to the inks.
Cleanest result, best on complex illustration. Drifts when the instructions are wrong.
Professional hybrid
Pick the method per element, like a designer: real fonts for type, AI for complex drawings, tracing only for big flat shapes.
Best when a font truly matches. You preferred it by eye on Cowgirls.
Round 2: same methods, from the on-model images
You usually extract from the on-model images, so I re-ran everything from them. They hold about half the detail (29–35 ppi), and the AI model render had already changed the design: it bent the straight LAKE LIFE wordmark into an arch.
| Design | Best from hanger photo | Best from on-model |
|---|---|---|
| Lake Life | 0.73 | 0.70 |
| Buckle Up | 0.82 | 0.77 |
| Ocean back | 0.98 | 0.92 |
| Ocean pocket | 0.99 | 0.97 |
F1 silhouette match against the real sample (1.0 = identical outline). On-model sources lose some fidelity on detailed designs, but are fine for bold ones.
What went wrong (and the rule each mistake created)
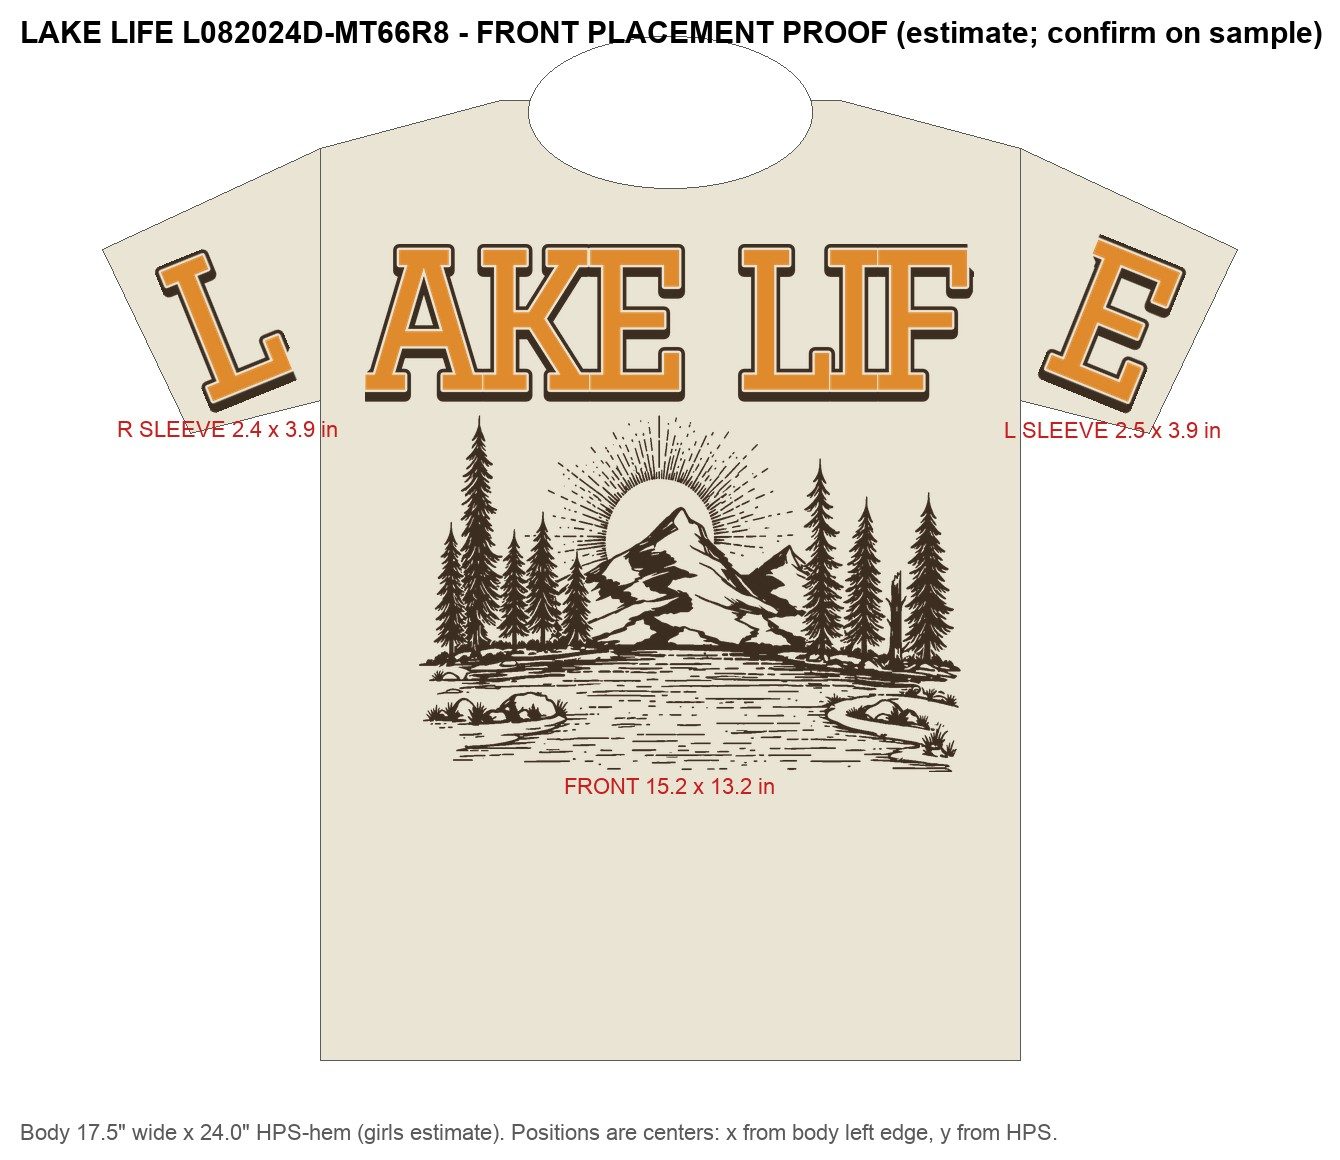
Lake Life's L and E are sleeve hits
Every round-1 and round-2 version treated "LAKE LIFE" as one wordmark. The factory prints cut panels, so the L and E need their own files. Rule: map every print location first.
One wrong word in the inventory
I wrote "BUCKLE UP is one straight line"; it is arched. Plan B followed my instruction exactly. Fixing the word raised its match from 0.37 to 0.53. Rule: an independent agent verifies the inventory before anything is drawn.
The "white keyline" was the shirt
I built Lake Life with 3 inks. The verifier sampled the pixels: the keyline matches the shirt color, so it is a knockout and Lake Life is 2 inks. Rule: sample keylines before calling them ink.
Fixed boxes clip AI layouts
Erasing a fixed box to reset "COWGIRLS" also erased the rider's head. Rule: edit the actual letter shapes, never a fixed rectangle.
Color-reduced only
Sara had already said reduced "limited trace" files don't work for her. Rule: always ship a full-color master and the separations.
Skin read as ink
On-model crops include arms; skin tones landed in the orange ink. Rule: mask the model's body before choosing inks.
Round 3: the skill run
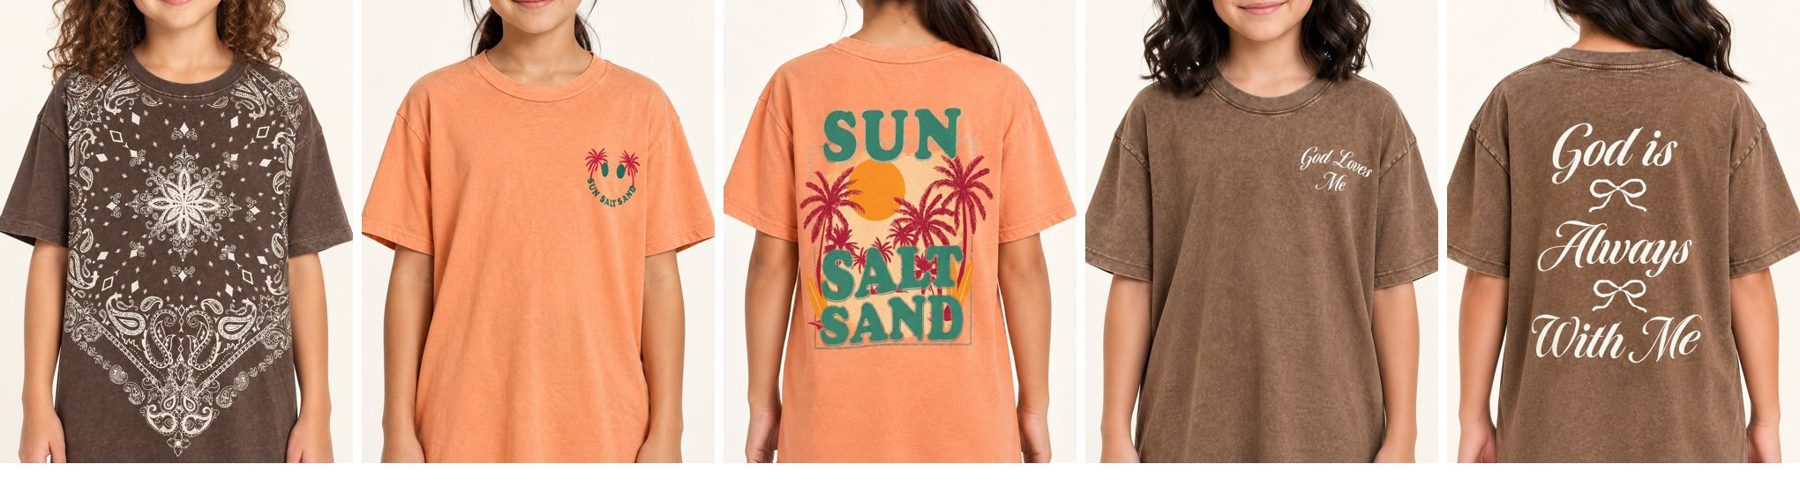
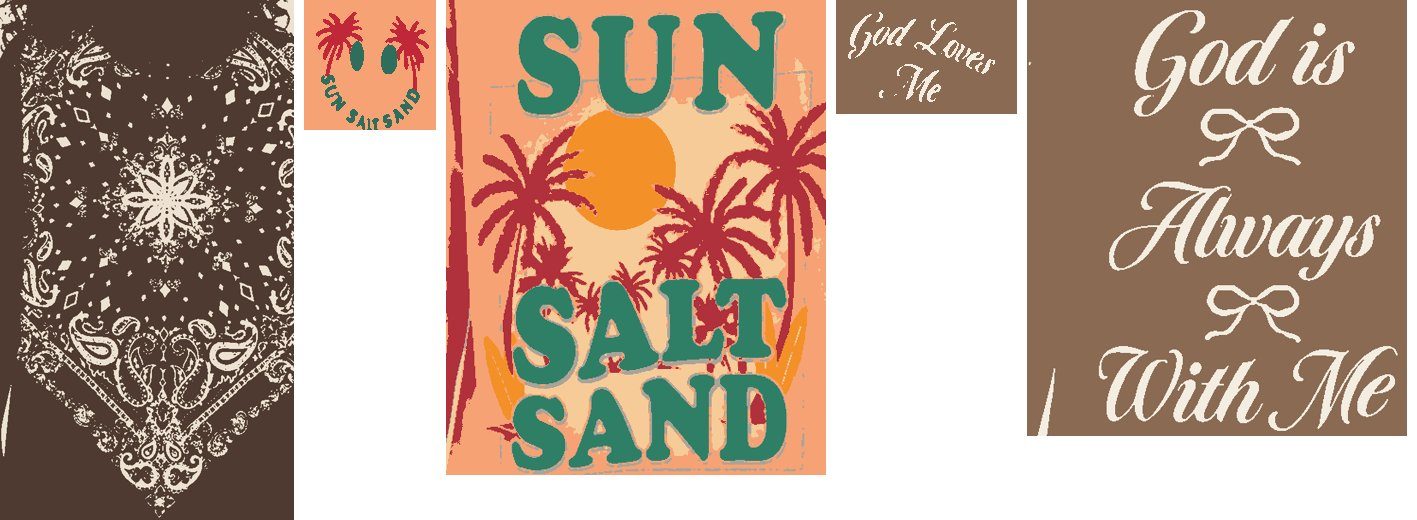
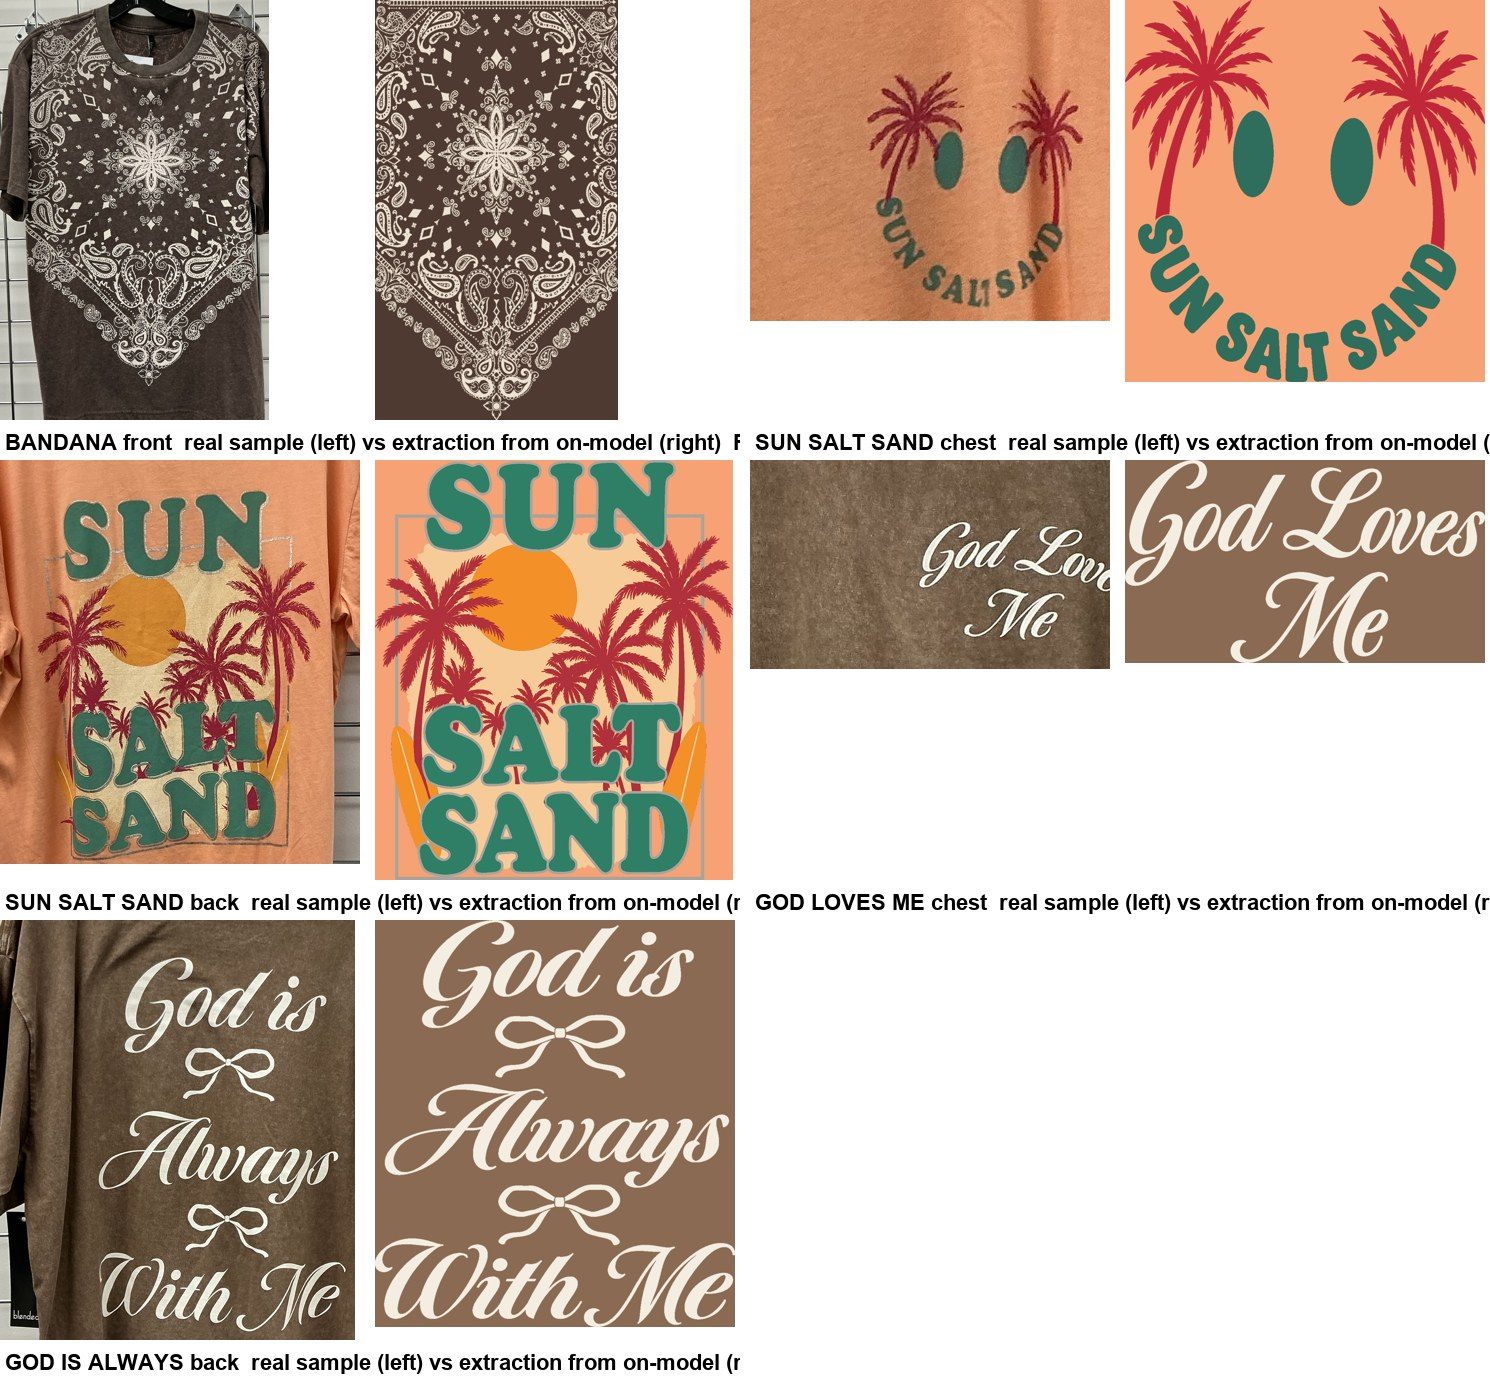
Three new picks (Bandana, Sun Salt Sand, God Loves Me) plus a correct Lake Life, using only the on-model images. The real hanger photos stayed hidden until a blind check at the end.
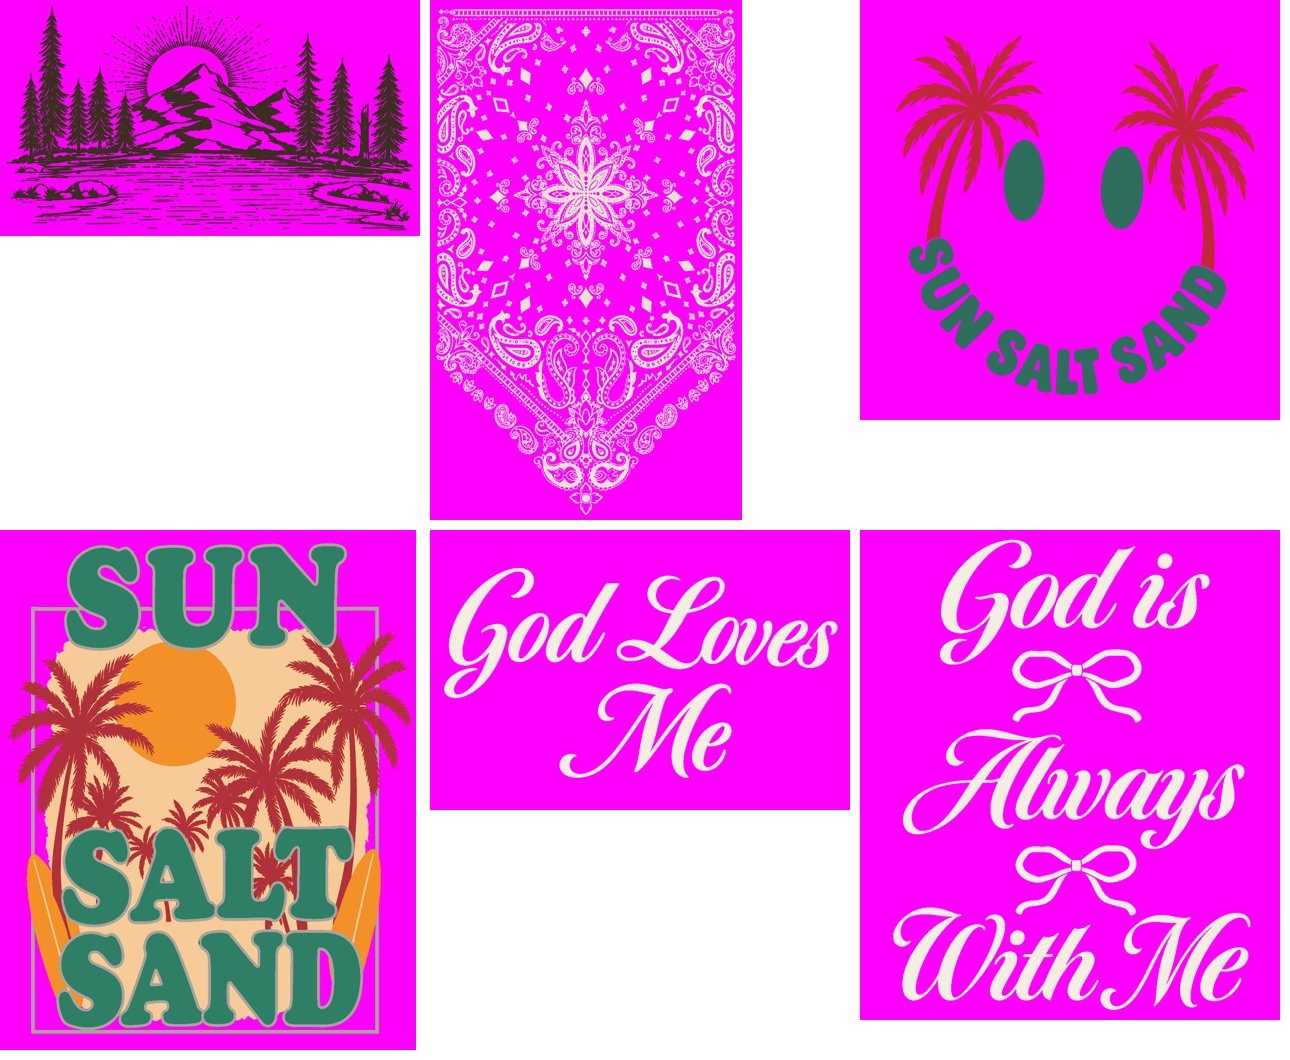
Each method: what, why, critique, next time
1 · Print-location map (gate)
- What
- Listed every print location before any art work. Lake Life became 3 files; chest and back prints are separate files.
- Why
- The factory prints cut panels; this was the mistake you caught.
- Critique
- The first L/A cut fell inside the L because the font's tight spacing merged the letters. Fixed by giving each outline pixel to its nearest letter.
- Next time
- Build lettering letter by letter from the start; write the location map into the inventory.
2 · Scale without a ruler
- What
- Measured the garment's body width by eye and assumed a 17.5" girls body: about 27–31 ppi.
- Why
- On-model images have no gridwall; this is what a designer would do.
- Critique
- Lake Life landed within about 6% of the real measurement. The bandana came out 31" long, too tall for a girls tee, so it is flagged "confirm on sample."
- Next time
- Use the tag size's spec (chest and length) and check both width and length.
3 · Inks: body mask and palette
- What
- Color clustering per location; skin, hair and wash assigned to the garment; inks chosen by eye.
- Why
- In round 2, arm skin was read as orange ink.
- Critique
- An arm still leaked into the Sun Salt Sand back as a red strip (the AI rebuild ignored it).
- Next time
- Mask skin by hue before clustering. Ask "how few inks carry this?"
4 · Inventory + independent check (gate)
- What
- I wrote the inventory (exact words, counts, geometry, inks); a separate agent re-derived it from the images.
- Why
- One wrong word broke a whole plan in round 1.
- Critique
- It caught 14 corrections: keyline is a knockout, shadow drops straight down, 5 + 4 trees, the God Loves front slopes down, outline bows, missing bandana borders, two AI artifacts, three clipped crops. The single most valuable step.
- Next time
- Keep it; add measured angles and letter heights to the format.
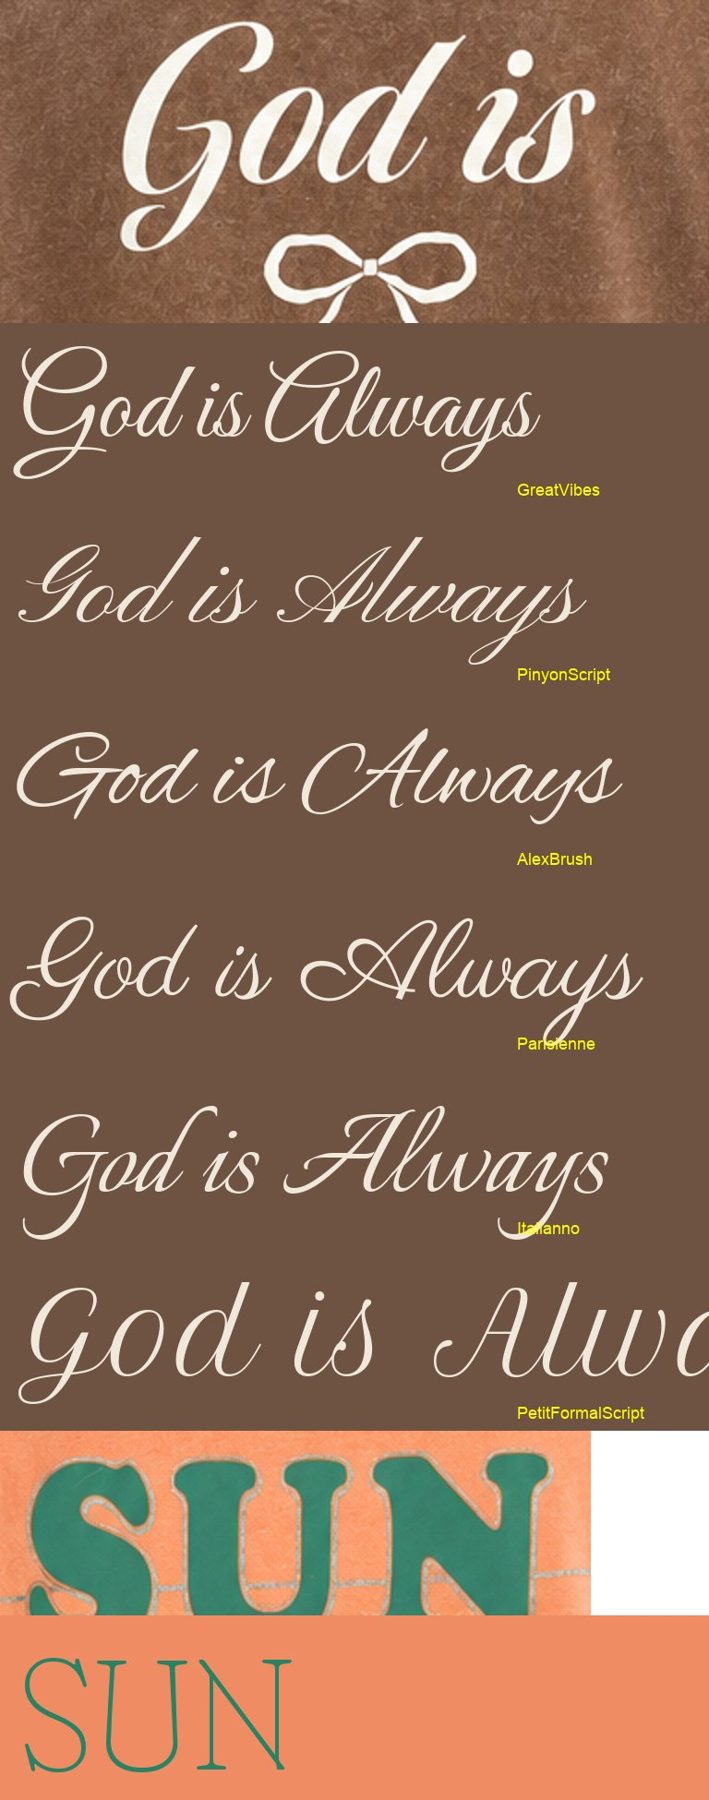
5 · Lettering: real font or AI
- What
- Lake Life in Graduate (real font). God Loves Me and SUN SALT SAND in AI lettering, because none of the free fonts matched.
- Why
- Your rule: a real font wins when it looks right by eye; AI lettering only when nothing fits.
- Critique
- The AI script is a bit heavier and rounder than the real sample.
- Next time
- Check Adobe Fonts (likely included with Photoshop) for the real script; send you a font lineup to pick from in seconds.
6 · Illustration: constrained AI rebuild
- What
- Codex redrew each piece with the verified inventory pasted in: flat inks only, magenta background, exact counts, artifacts to remove.
- Why
- At about 30 ppi, tracing melts edges.
- Critique
- First passes were accurate (tree counts, smiley geometry, bows). Small bandana details differ from the real one.
- Next time
- Generate two versions per design and keep the closer one; six runs take about 4 minutes in parallel.
7 · Symmetry (bandana)
- What
- Kept the half that matched the sample better and mirrored it.
- Why
- Bandanas are designed as one half mirrored.
- Next time
- Confirm the axis on the sample; mirror before the inventory check.
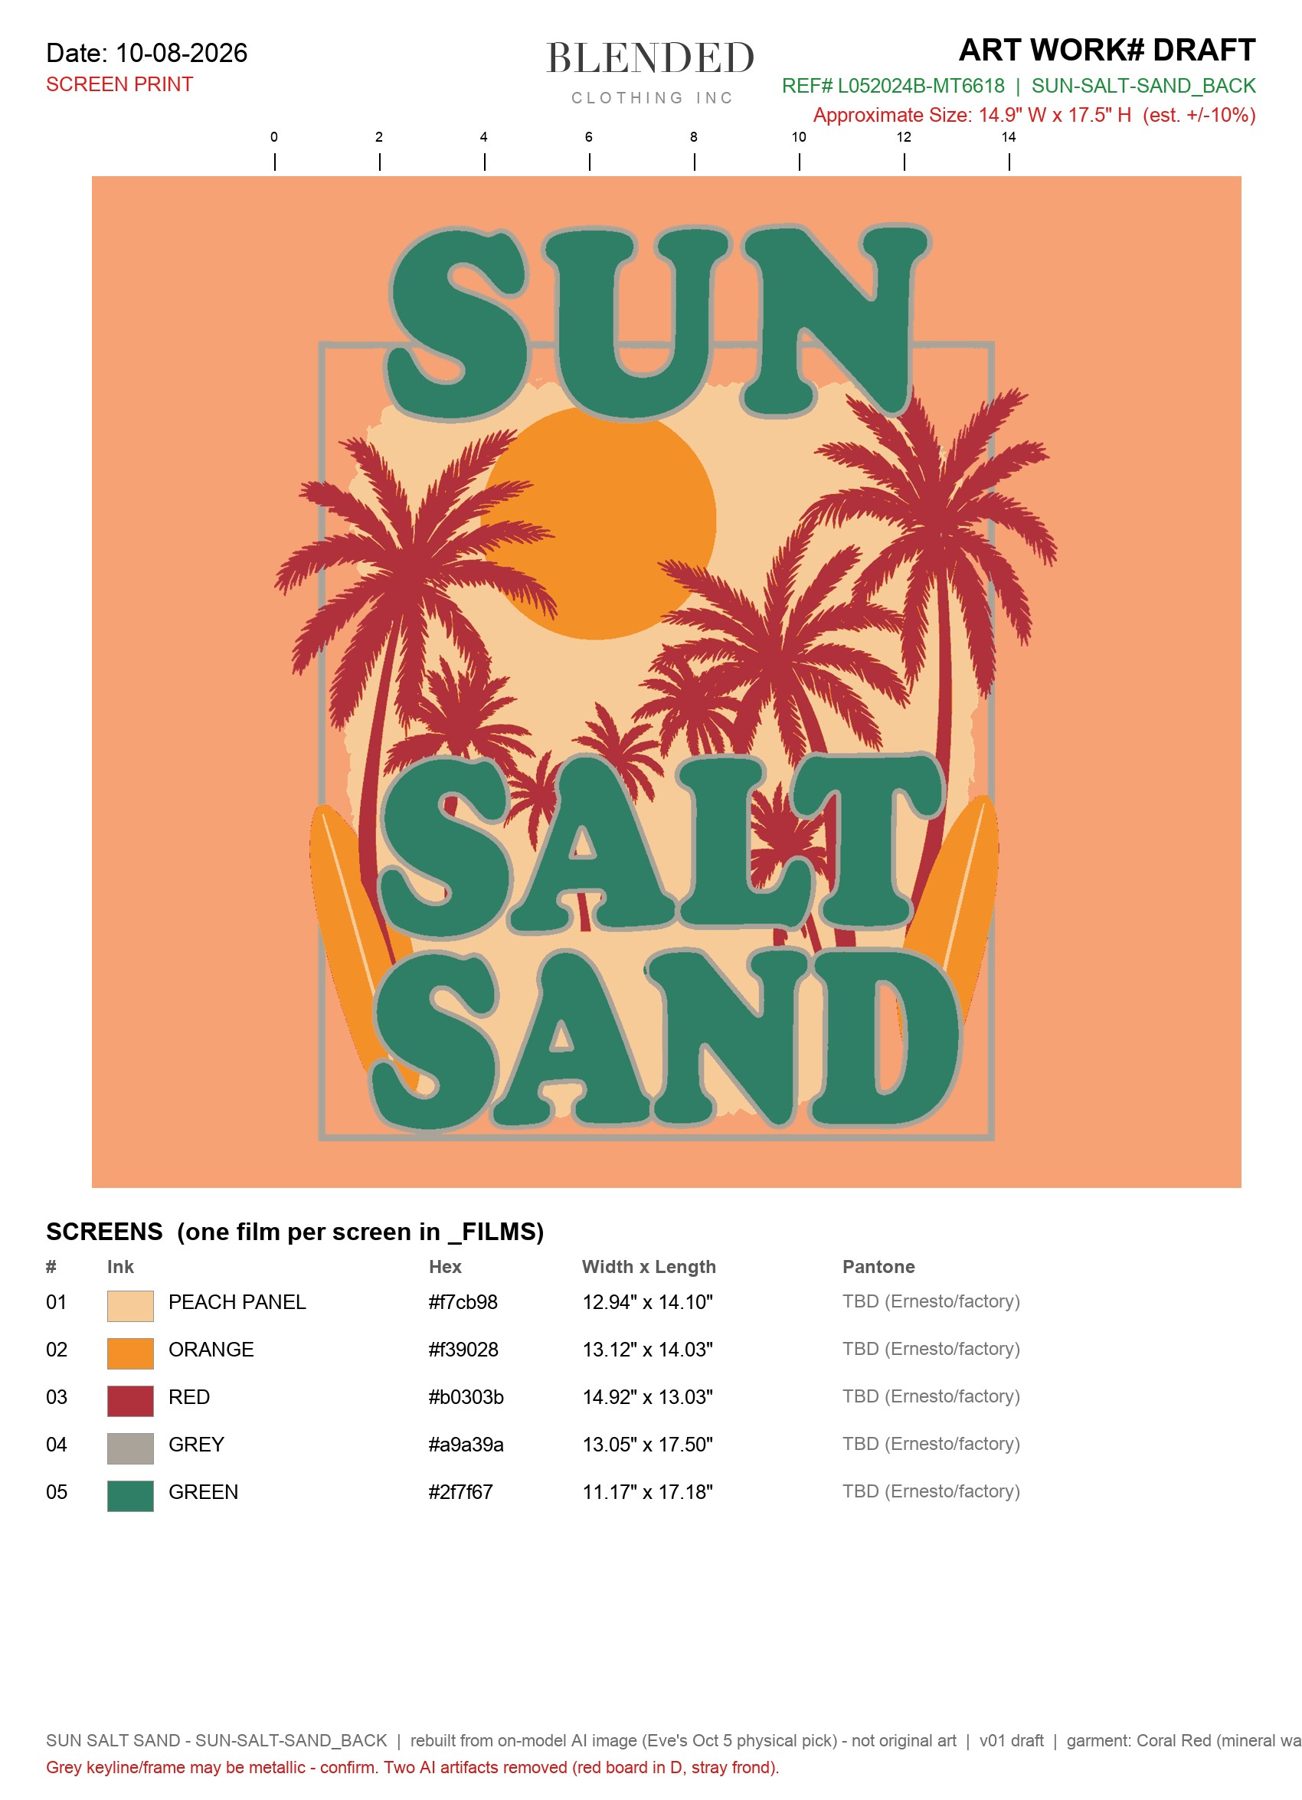
8 · Two deliverables: master + separations
- What
- Each location ships a smooth full-color master PNG and a separations PSD with one film per screen and a size table.
- Why
- Sara needs the clean master; Ernesto and the factory need screens, sizes and Pantone slots.
- Critique
- Pantone numbers are still blank (no licensed library here). About 5% of the Sun Salt Sand orange screen is thinner than 1 pt (a trapping question).
- Next time
- Add Pantone Connect or Ernesto's ink list; add an automatic trap/choke pass.
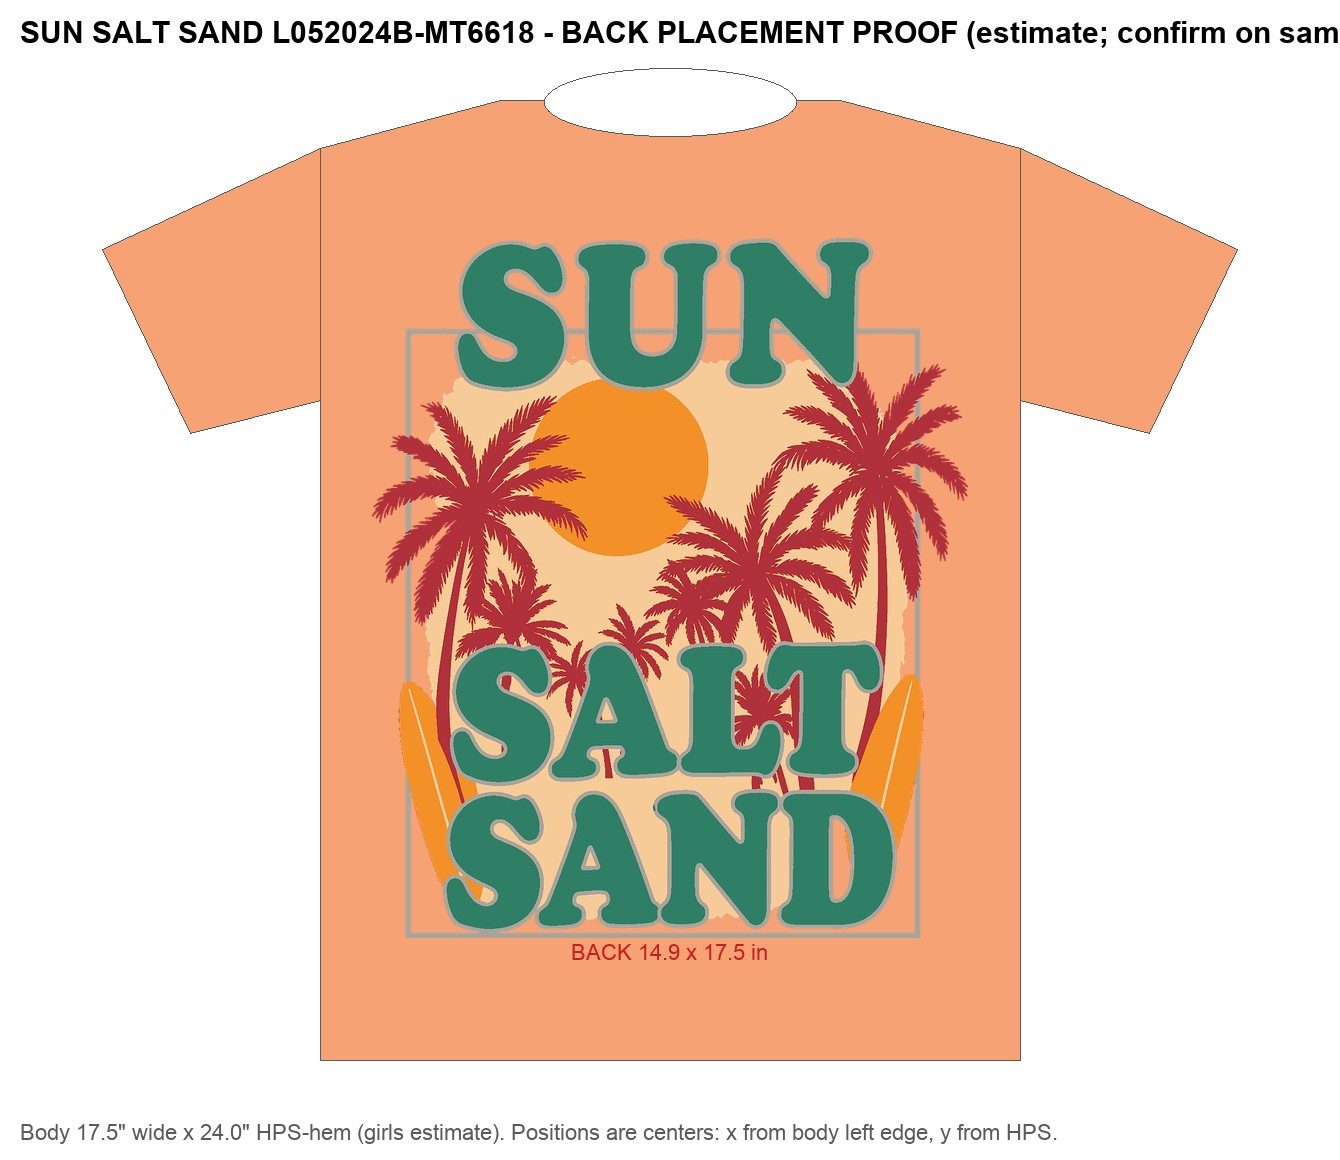
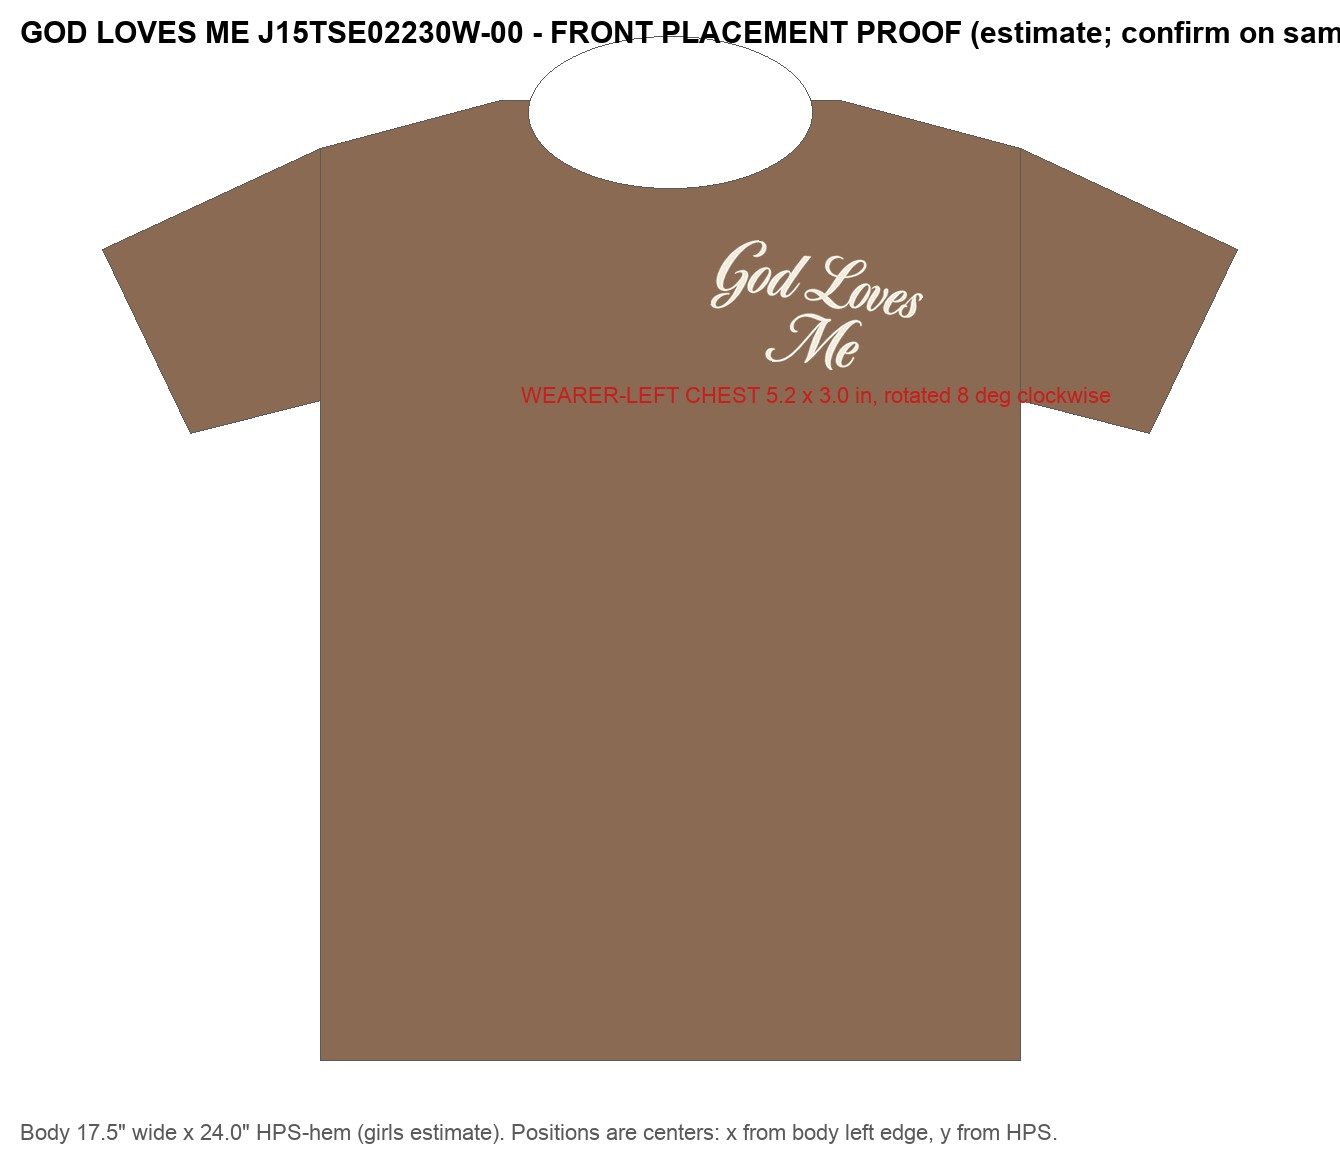
9 · Photoshop finishing, QA and proofs
- What
- A script builds each PSD in Photoshop (one layer per screen, hidden references), plus films, pitch sheet and placement proof. An independent reader checks every PSD.
- Result
- All 8 PSDs: one color per screen, zero overlaps, hard edges only, film count matches.
- Next time
- Measure sleeve placement from the shoulder seam once on a real sample; put the size source and rotation on the pitch sheet.
The skill: art-extract v1
Everything above, written down so Codex or Claude can repeat it. File: Art Extractor/skills/art-extract/SKILL.md; scripts in the test folder's tools/.
- Intake. Request list from the buyer email. Best source first: Studio original › sample shot flat › hanger photo › on-model image › thumbnail. Freeze and log time.
- Location map. Every print location; split anything that crosses a seam.
- Crop + scale. Gridwall if visible, else garment size. Sizes labeled "est. ±10%".
- Inks. Cluster colors, mask the body, choose the fewest inks that carry it.
- Inventory + independent check. Exact words, geometry, counts, keylines, artifacts. Only the checked version is used.
- Route each element. Real font if it looks right; else AI lettering. Illustration: constrained AI rebuild. Trace only big flat shapes. Mirror symmetric art.
- Build. Register to the sample for size, Photoshop Preserve Details upscale, full-color master + snapped separations.
- Finish. PSD per location, films per screen, screen sizes, pitch sheet, placement proof.
- QA. Independent PSD read-back, visual check vs source, blind check vs a real sample when one exists.
- Review + send. You review; drafts only until you say send.
What's next
Prove it with the team
Send one package (e.g. Sun Salt Sand) to Ernesto and ask: "What would you change before this goes to the factory?" His answer calibrates the skill.
Close the Pantone gap
Pantone Connect or Ernesto's standard ink list turns the "TBD" column into real numbers, completing the factory spec.
Better sources
When a sample exists, shoot it flat with sleeves spread and a ruler in frame. That doubles the detail compared with the on-model images.
Compare with Sara's masters
When Larry sends Sara's original art for these picks, overlay our files on hers. That is the real final exam.
Terms
| Screen / ink | One printed color. Each needs its own screen, so ink count drives cost. |
| Separations ("seps") | The art split into one image per screen. |
| Film | Black-on-white positive of one screen, used to burn the screen. |
| Knockout / keyline | A thin gap where the shirt shows through between colors. Not an ink. |
| Sleeve hit | Print on the sleeve panel; a separate file and placement. |
| ppi at size | Pixels per inch at the real print size. Factories want 300; our sources had 30–62. |
| F1 match | How closely our outline matches the real sample's outline (1.0 = identical). |
| Pitch sheet | Ernesto's one-page spec: technique, size, colors, art on garment. |